Created on
Updated on
Texturing & Look Development
all the details matter

Preface: Welcome to this very long series of filmmaking in the age of AI(2026).
A 3D model fresh from modeling is gray. Not literally — most software applies a default shader that gives it a neutral surface — but effectively gray, in the sense that it communicates nothing about what the thing is made of. You cannot tell if it is plastic or skin, steel or wood, old or new, wet or dry. Geometry defines the shape. Appearance defines the reality. Texturing and look development are the two disciplines that turn shape into material, and material into something the eye reads as belonging in the world.
They are not the same discipline. Texturing is the process of creating the surface detail — the photographic and painted information that describes what a surface looks like up close. Look development is the process of defining how that surface responds to light — the shading model, the material properties, the interaction between the asset and its environment. One produces maps. The other builds the shader. Together they determine whether a CG element reads as real.
The UV problem
Before any texture can be applied to a 3D model, the model has to be unwrapped. A texture map is a two-dimensional image. The model is a three-dimensional surface. Getting one onto the other requires a mathematical operation that converts the 3D surface into a flat layout — the same problem a cartographer faces when trying to represent a sphere as a flat map.
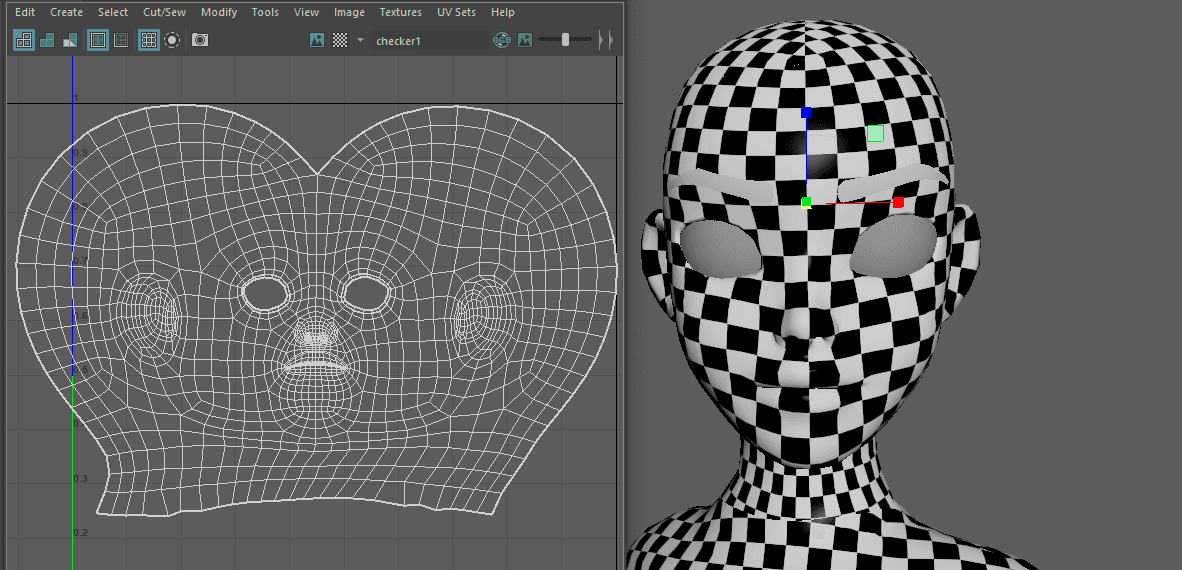
UV unwrapping cuts the model along seams and flattens it into a 2D space called UV space, where U and V are the horizontal and vertical coordinates (X and Y are reserved for 3D space). Every point on the 3D surface maps to a specific pixel location in the texture. Move the mouse across the flat UV layout and you move across the surface of the model. Paint a pore at a specific UV coordinate and that pore appears at the corresponding location on the 3D surface.
The placement of seams matters. A seam is a visible cut in the unwrap — the places where the flat layout was separated. Well-placed seams hide in areas the camera rarely sees: inside joints, along the back of a neck, underneath a limb. Poorly placed seams show up as discontinuities in the texture — lines where the surface detail doesn't align across the cut. On a hero character in close-up, a visible UV seam is a failure.
Production characters use a system called UDIMs — a grid of UV tiles, each representing a separate high-resolution texture map. Rather than cramming an entire character's texture information into one map, UDIM workflows distribute it across dozens or hundreds of tiles, each at full resolution. Avatar's characters required over 30 separate texture channels per asset — handling tens of gigabytes of data per character. The system was designed to handle exactly that scale.
What the texture artist does
The texture artist receives a model with clean UVs and produces the surface detail: every scratch, pore, stain, wear mark, and material variation that defines how this specific object looks in this specific state. The information they produce is stored as a set of maps — separate image files, each encoding a different aspect of surface appearance.
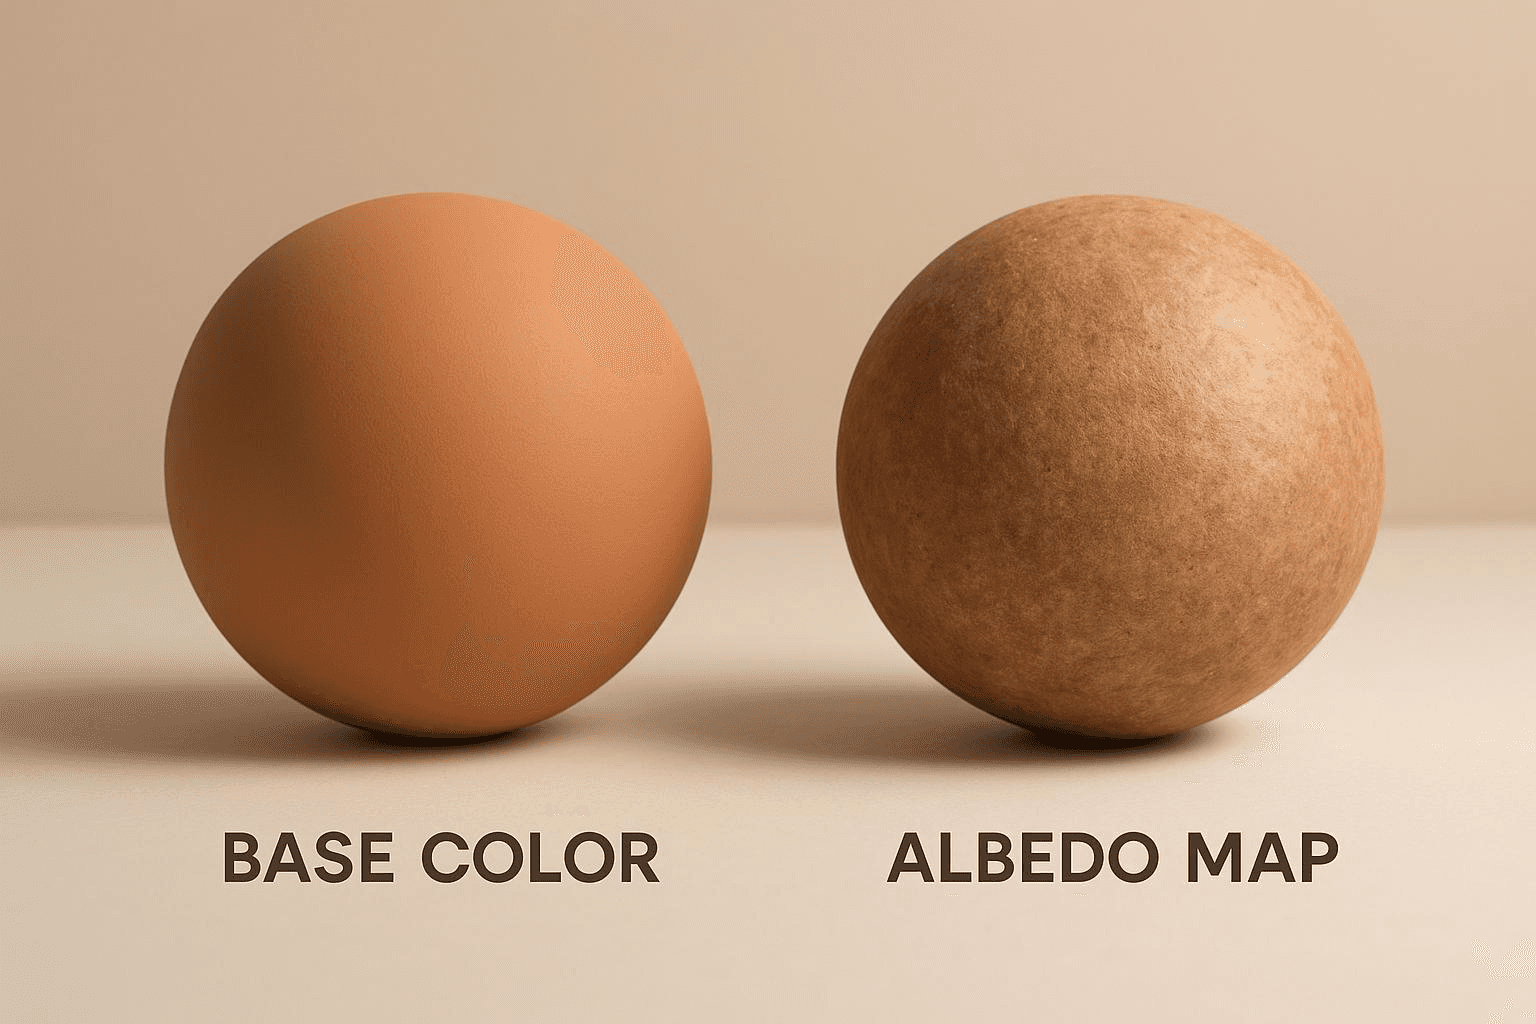
The color map (now more precisely called the base color or albedo map) defines the surface color independent of lighting — what color the surface is in a perfectly neutral, shadowless environment. This separation from lighting is intentional. A shader that bakes color and lighting together looks wrong under different light conditions. Separating them allows the same texture asset to be used in any scene, under any lights.
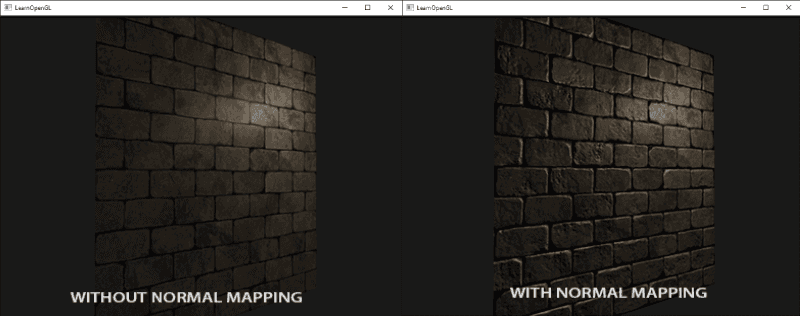
The normal map encodes the illusion of fine geometric detail without adding real geometry. It is an image where the RGB values represent surface normals — the direction the surface is facing at each point. By perturbing the normal direction across a flat polygon, a normal map can make it appear to have fine bumps, scratches, and surface texture that would be prohibitively expensive to represent in actual geometry.

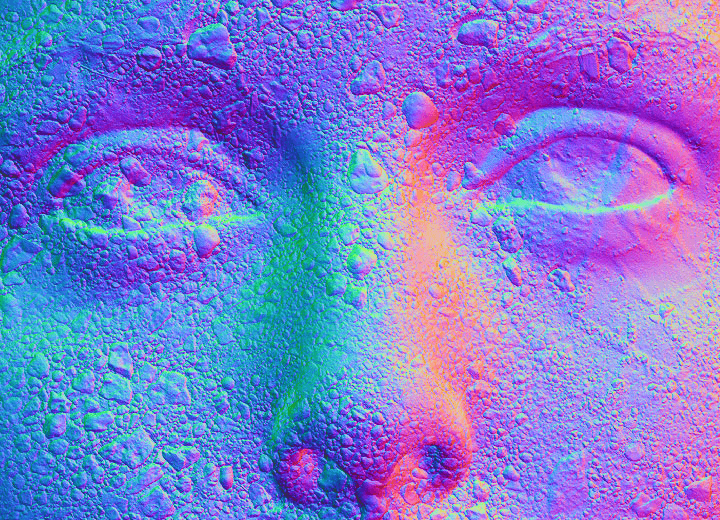
To understand how it works, you need to understand what a surface normal is. Every point on a 3D surface has a normal — a vector pointing perpendicular to the surface at that point. The renderer uses these normals to calculate how light hits the surface: a normal pointing directly at the light source produces a bright response; one pointing away produces a dark response; one at an oblique angle produces a midtone. This calculation happens at every pixel of every surface in every rendered frame. The normal is the fundamental unit of shading.
A flat polygon has the same normal at every point across its surface — they all point in the same direction, which is why a flat polygon renders as uniformly lit. There are no bumps, no scratches, no variation in how light falls across it. A normal map changes this by storing a different normal at every pixel — encoded as an RGB color value, where the red, green, and blue channels represent the X, Y, and Z components of the normal vector respectively. The distinctive blue-purple color of a normal map is not arbitrary: a surface pointing directly outward — the default, unperturbed normal — encodes as (128, 128, 255) in 8-bit RGB, which is that characteristic lavender. Deviations from that value represent normals tilting in various directions.
When the renderer evaluates a surface with a normal map applied, it reads the encoded normal at each pixel and uses that instead of the polygon's actual geometric normal. A scratch across the surface is a band of pixels whose normals tilt slightly toward and away from the scratch's edges — exactly as a real scratch would tilt the surface. The renderer shades those pixels as if that tilt is real geometry, producing the highlight and shadow behavior of a physical scratch. The polygon is still flat. The light behaves as though it isn't.
The normal map is almost always produced by baking — the process of transferring detail from the high-resolution ZBrush sculpture onto the low-resolution production mesh. A ray is cast from each pixel of the low-res mesh toward the high-res surface. Where that ray hits, the renderer reads the high-res surface's normal and records it in the bake. The result is a normal map that carries every pore, wrinkle, and surface irregularity from the sculptor's work, ready to be applied to a mesh with a fraction of the polygon count. The displacement map does the same thing but goes one step further — rather than just changing the shading behavior, it physically displaces the geometry at render time, producing actual geometric relief from a grayscale value. The distinction matters at distance and in close-up differently: normal maps hold well at middle distances, displacement maps are necessary when the camera is close enough to see actual surface relief.
The displacement map goes one step further: it physically displaces the geometry at render time, producing actual geometric detail from a grayscale image, which is why the ZBrush sculpture from the modeling stage gets baked to a displacement map rather than used directly.

The tools for producing these maps are specialized by pipeline. Photoshop handles flat 2D work — color work, manual painting, detail layers.
Mari, developed at Weta Digital by Jack Greasley during the production of Avatar and commercialized by The Foundry in 2010, handles 3D paint directly on the model surface — the texture artist paints directly onto the geometry, which is the only practical approach for a character with hundreds of UDIM tiles and textures measured in tens of gigabytes.
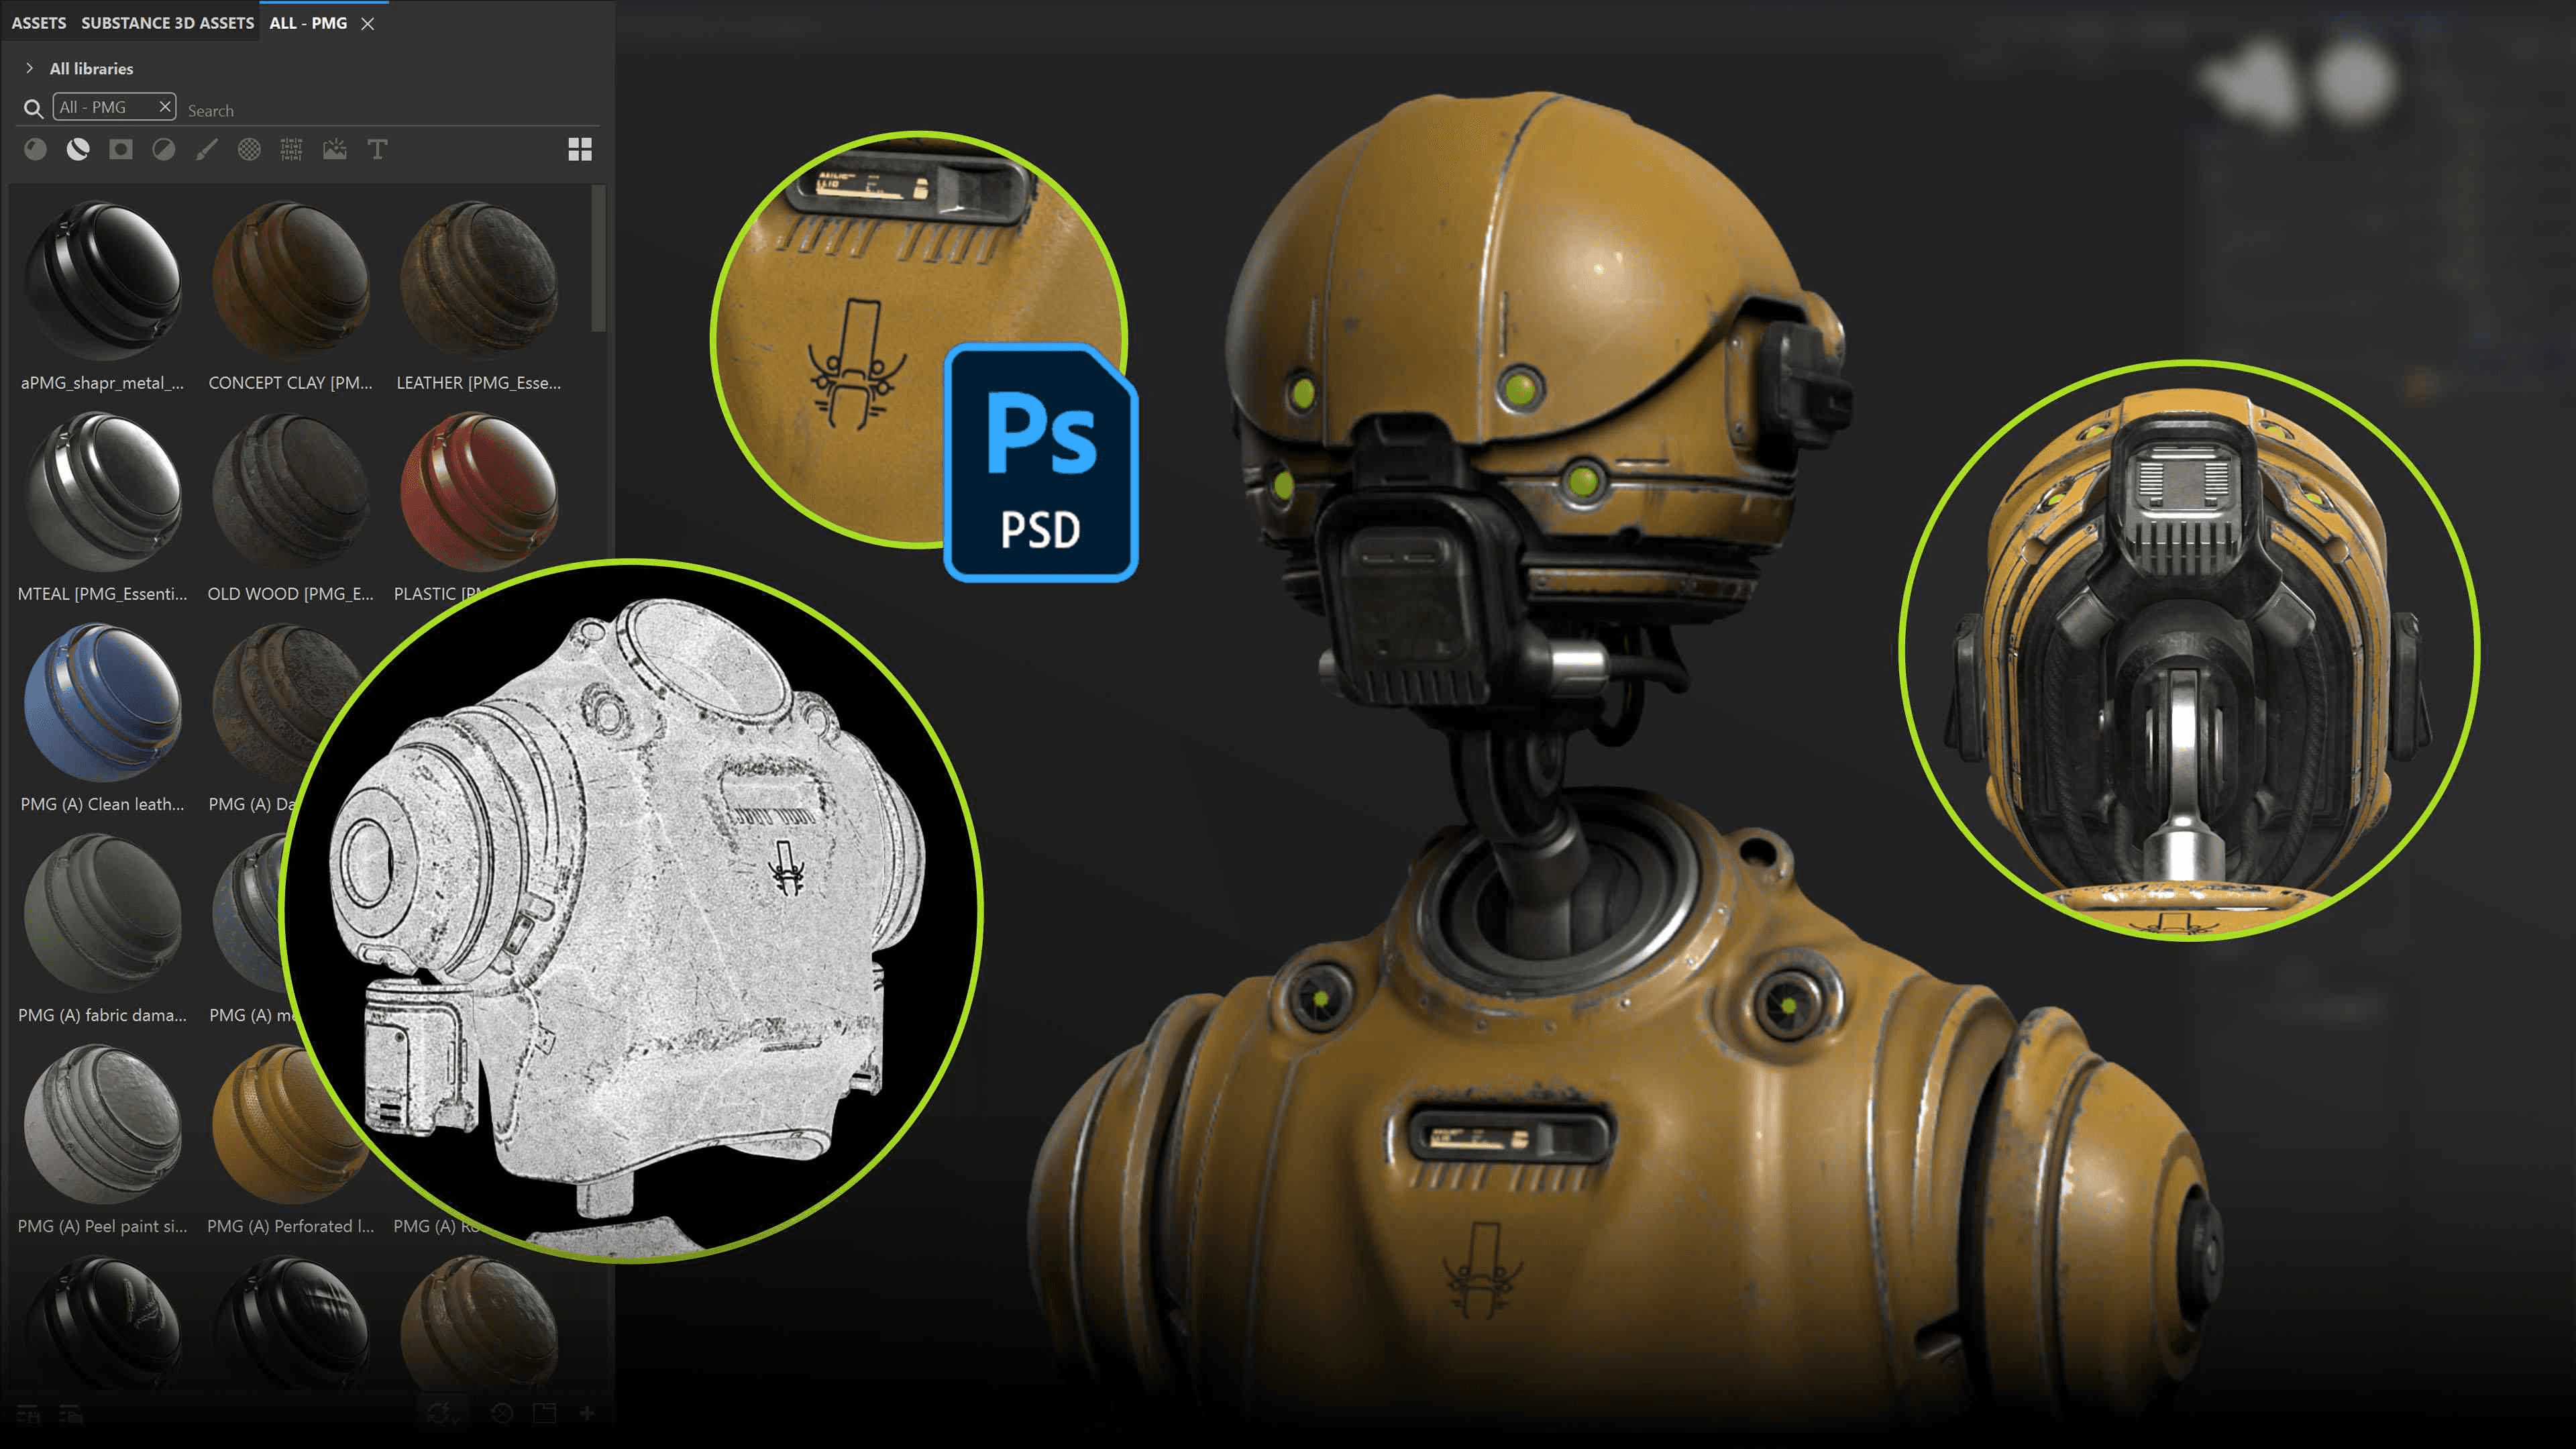
Substance Painter, released by Allegorithmic in October 2014 and acquired by Adobe in January 2019, brought a faster procedural workflow oriented toward game production — smart materials, particle brushes, real-time PBR preview. The two tools split the industry roughly along its fault lines: Mari for film and high-end VFX, Substance for games and rapid asset production.
What look development does
Look development takes the texture maps the texture artist produced and defines how they interact with the rendering system. The look dev artist builds the shader — the mathematical description of how light interacts with this surface — and calibrates it against reference photography of the real object or the concept design.
For most of CG's history, shaders were written empirically. An artist adjusted parameters until the render looked right to the eye. The problem was that "right to the eye" in one lighting environment looked wrong in another, because the shading model wasn't physically correct — it was just a convincing approximation in specific conditions. Moving a character from the outdoor environment it was lit in during look dev to an interior scene could require rebuilding the entire shader from scratch.
Physically based rendering resolved this. The theoretical foundations of PBR had existed since the 1980s — the Cook-Torrance reflectance model (1982), the work of James Kajiya whose rendering equation (1986) provided the mathematical framework for physically accurate light simulation. But the translation into production-ready material authoring happened at SIGGRAPH 2012, when Brent Burley at Walt Disney Animation Studios presented the Disney principled BRDF. BRDF stands for Bidirectional Reflectance Distribution Function — the mathematical description of how a surface reflects light from any incoming direction to any outgoing direction. Burley's model provided a small set of artist-friendly parameters — base color, metallic, roughness, specular, clearcoat — that were physically grounded but humanly operable. You could hand a look dev artist a parameter set and they could reconstruct any real-world material from it. More importantly, a material built correctly in PBR terms would look correct under any lighting condition, in any environment, without revision.

The industry adopted it immediately. RenderMan, Arnold, V-Ray, Mantra — every major production renderer rewrote its shading systems around physically based principles within a few years of Burley's paper. The metallic-roughness workflow it described became the standard not just in film VFX but in games, real-time engines, and product visualization. The Disney BRDF is arguably the most consequential single technical publication in the history of digital materials.
The render engine relationship
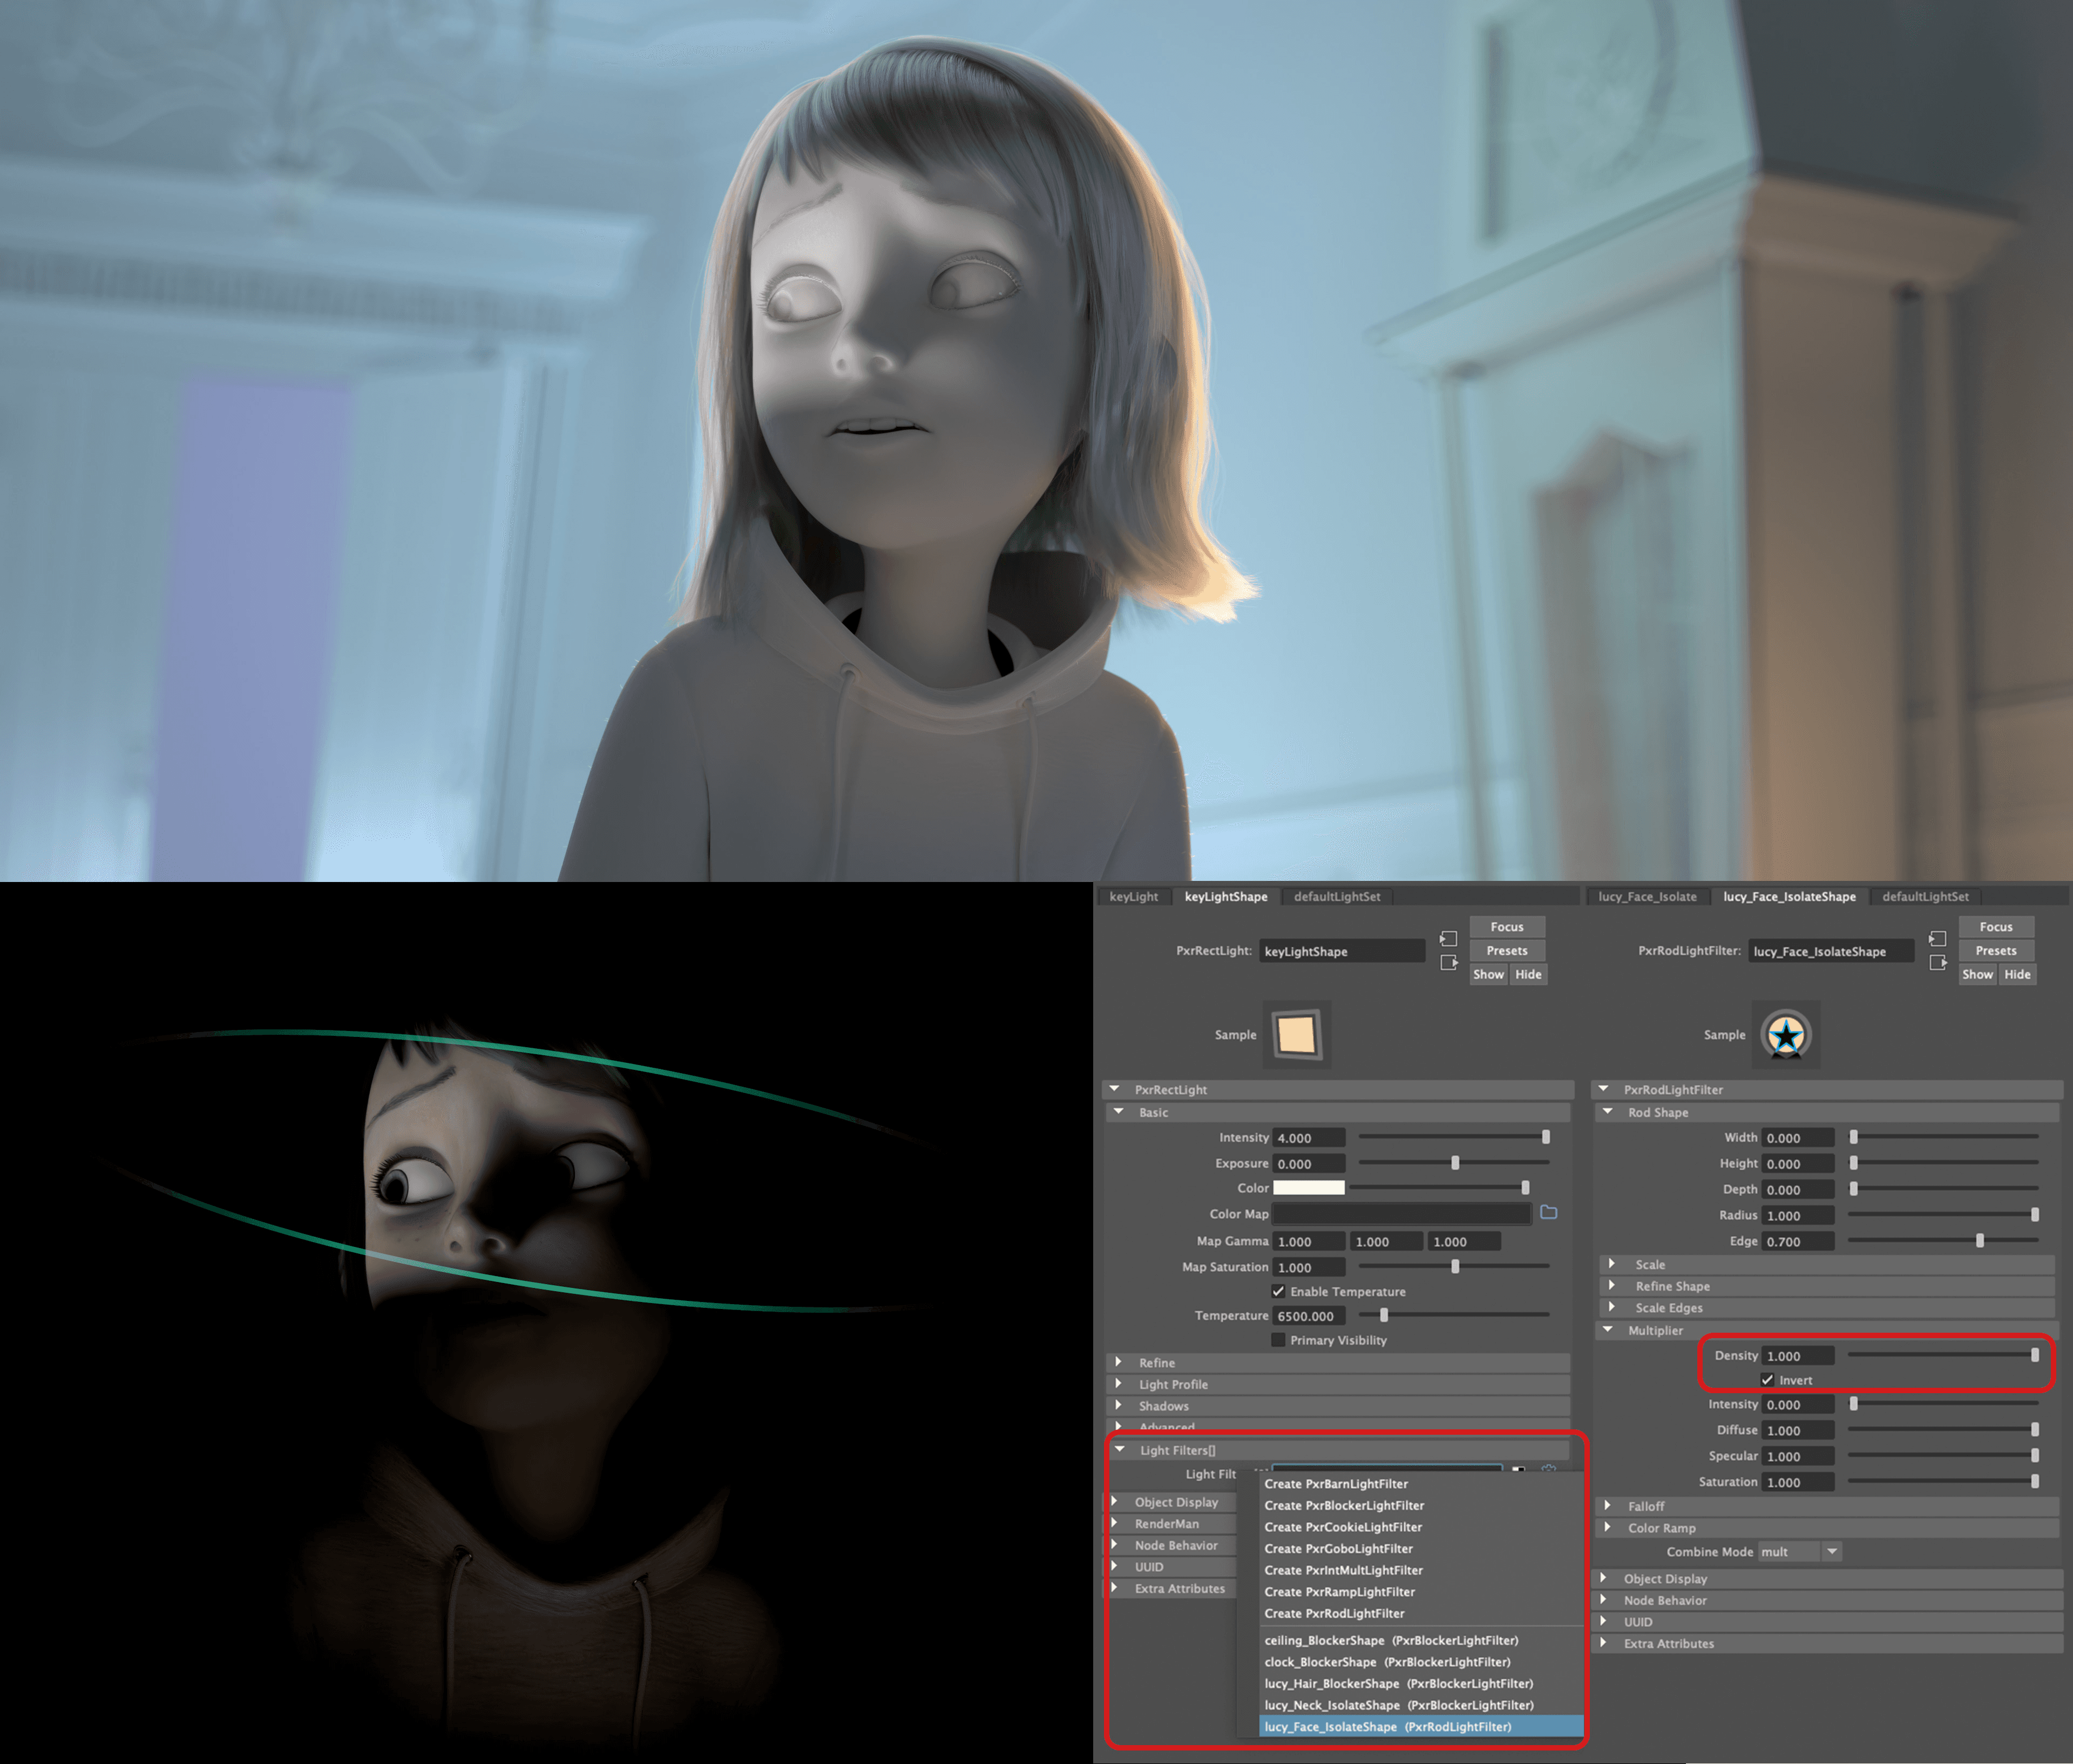
Look development cannot happen without a render engine to evaluate the shader. The look dev artist works in a lighting-neutral environment — a grey sphere, an HDRI dome, a neutral studio light setup — and builds the material so that it responds correctly to light, not just looks correct in one specific setup. The goal is a shader that holds up under scrutiny: in daylight, in interior light, in the dark with a single rim light, at any camera angle, at any distance.
This work is done in the renderer the production runs. RenderMan, developed at Pixar and first used in production on the short film Tin Toy in 1988, has been the dominant renderer in feature animation and VFX for decades. Arnold, created by Marcos Fajardo and commercialized through his company Solid Angle before being acquired by Autodesk in 2016, became the primary renderer at many VFX studios in the 2010s for its straightforward physically based approach and robust handling of complex geometry and hair. Both are production path-tracers: they simulate the physical behavior of light by tracing millions of rays through the scene and calculating their interactions with surfaces and volumes.
The look dev artist works at the boundary between art and physics. They need to understand how light actually behaves — the difference between metallic and dielectric surfaces, how roughness distributes specular highlights, how subsurface scattering makes skin glow differently than plastic at its edges — and they need the visual judgment to know when a shader has been dialed correctly. The two skills are not the same and both are required.
The finished asset — textured, shaded, look-devved — is the thing that goes into production. It is what every lighting artist will use in every shot the character appears in. A mistake in the look dev that isn't caught early propagates across hundreds of shots and costs enormous time to fix. A well-built asset that survives any lighting condition, at any distance, in any context, is one of the most valuable things a VFX pipeline can produce.
🫶🏼